Saturday, June 2, 2012

The boat (still unfinished) is for sale.


I’m trying to think of what was done when and found myself having to read the blog post to remind me where we left off. There has been minimum progress but I have no idea of the time so I think I’ll just ballpark that and we’ll call it up to date.

All the deck and cockpit floor was installed and filleted in place when we last left but no picture was added at the time so this is the first pic posted of the completed hull.


 I have a few pictures of on hand of the cabin or coach roof construction to show.  It was a simple process using cedar strips approximately ¾” x ¼”. I used a few wider strips to start the center but if I were to do it again I would opt for the same size strips all the way. I used a staggered pattern as you can see in the photo and it made laying them in easy enough. They are glued with standard wood glue to help speed laying it up. This is an acceptable practice as the whole thing then gets sandwiched between two layers of epoxy and 4oz.  biaxial cloth. The sanding prior to laying the cloth was done with an orbital sander on the inside and an orbital and long board sander on the outside. Don’t be afraid to use some 40 grit here as you are shaping the cedar to fair it and it gets the epoxy glass covers.


Just typing a few lines reenergizes my desire to get things back on track but we’ll see.  Just getting an hours work on it seems overwhelming right now.

I’ll leave her up for sale in the meantime and see how it goes.


Time this segment:
We won't count moving across half the country and the time it sat on the trailer in the garage!
Glue up all the deck panels 6 hours
Fillets on all deck panels 3 hours
Laying Cedar Strips 6 hours
Sanding/Fairing inside and  outside 6 hours
Glass inside cabin roof 1 hour or less
Total this segment 22 hours
Total Project: 167 hours
Saturday, September 12, 2009

Their rounding the bend and here they come...


After the paint had set for 24 hours we could finally resume building something and it couldn’t happen soon enough. With all the delays, economic setbacks and miscellaneous side projects it seemed as though this stage would never arrive.

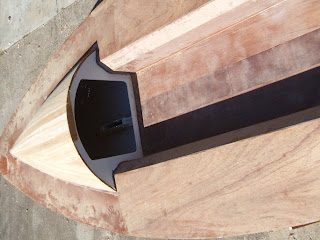
Arrive it has and it has certainly lifted the spirits and we’re working with a renewed vigor. All the parts that weren’t cut and waiting were quickly laid out and cut. I laid out the aft seat/decks as outlined on the plans sheet and cut them out and immediately remembered I had planed to leave the outside arc a little proud and trim it back to fit with the router. Well to late for that I guess. There was some discrepancy all right and it will take a little filling to correct but nothing major and certainly not the worst thing on the whole project. I knew the angled transom was a little wide and I would need to pull the hull sides in to mate the parts up. We did this very easily with a ratchet strap. All the pieces were stitched together just like the hull long ago and the fit wasn’t half bad all around. We tacked everything in place with thickened epoxy and then began the fillets on the inside.
This was the least fun I have had working on the entire boat. I don’t know of any other way to do this though so all I could to was recruit some help and get it over with. Laying face up in the aft bunk areas my helper would mix a batch of thickened epoxy and pass it to me through the aft end where the angled transoms would later be. One stringer then a hull/deck joint then the frame joint, slowly it all got its neat little fillet and I crawled out.

Of note here is an addition to the plans we felt necessary. There are no stringers designed into the frames under the cockpit floor, forward deck or along the aft deck/seats. These areas all span over 12 inches by up to 20+ inches and we felt it was going to be the week link in the boat. These are high traffic spots also.


We added the following stringers:
Cockpit deck - 2- 1 ½” x ¾”from the transom to frame “C” or the companion way frame evenly spaced.
Forward deck - 1- ¾” x ¾” about 8” in from and following the line of the gunwale from frame “E” to the spinnaker pole box forward of frame “A” each side.
Aft deck/seats an additional 1 ½” x ¾” by about 5 feet between frame “A” and “C”.

The pictures do not show the cockpit floor stringers.

That brings us up to date for the most part. We have been doing the filling and prep work to place the fiberglass on the deck and cockpit area but before that takes place we will need to tackle the cabin deck/roof. This has several possible approaches and we must decide on one quickly.


Time this segment:Cut and fit decks, seats and stringers 4 hours
Tack weld above parts in place 1 hour
Fillets inner stingers and joints 6 hoursLight sand, round over edges, prep decks, seats for fiberglass 1 hour Total this segment 12 hoursTotal Project: 145 hours

Thursday, September 10, 2009

Where have I been?

Lets see when last I made a post we were finishing up on the primer coats to the interior of the hull. Next up was of course the paint. System Three Topcoat in Orcas White was the choice. This is a water born polyurethane know as a WR-LPU and is supposed to be the thing when it comes to top paints. We sprayed the first coat and following the directions provided by System Three the product was thinned by less that 20%. It seemed to be going on OK but I was constantly fidgeting with the gun to get a setting that made me comfortable. This is not my first project to paint and I like to say I know what I’m doing in this area. About half way down the hull I looked back at what had been sprayed and I just about fell to my knees. RUNS. And a lot of them. I knew immediately that the paint was to thin because I was applying the thinnest coat I my have ever applied to anything. There wasn’t a lot to do but keep going and empty the gun. Then I quickly went over the entire thing with a foam roller and evened it out. All I could do now was walk away shaking my head and wait to see how it looked the next day. The time between coats is supposed to be when dry to the touch or about an hour. I new there was no chance of being satisfied with it the way it looked when I walked away so I decide to not even try for a second coat and would just give it the required light sanding in 24 hours and give it another coat after that. When I went to have a look the next day it wasn’t to bad but it sure wasn’t what I wanted in a finish so time to start sanding. A light once over and then wiped down it was time to try again. This time I thinned the paint a little less than 10%. Again getting the gun set was evidence that the same thing was going to happen and sure enough it starts to run. I quickly rolled it over and dumped the mixed paint thinking I’ll try one more thing. I mixed up a batch with out thinning and it went on beautifully. It went on smooth enough that if I didn’t tell you where I rolled and sprayed in the same coat you wouldn’t find it. My faith in the System Three products was restored and my self-confidence shot back up to normal. I am a painter.

Much more to tell you on the progress and some photos but we’ll get to that tomorrow.

Time this segment:
Prepping, cleaning the inner hull for paint 1 hour
One coat of paint, roll out runs 1 ½ hour
Sand first coat 1 ½ hours
Clean up, prep for paint 1 hour
Second coat of paint 1 ½ hours
Third Coat of paint 1 ½ hours
( no time counted on drying between coats)
Also note: Primer was allowed 1 full week to cure before paint was applied.
Total this segment 8 hours
Total Project: 133 hours

Friday, July 17, 2009

One is never enough… but 3 are just right.

After receiving the S3 Yacht primer yesterday I quickly got another coat on before winding down the day. A third and final coat this morning made all the difference. There were a few spots that after one coat I had hoped would fill in a bit with additional coats and they did. Without laying on excessively heavy coats I was able to make a little grain go away that showed up in the aft bunks from what I guess were too thin a coats of epoxy and heavily grained plywood. They still show a little but I think now with a light sanding they will be fair enough when the topcoats are applied. The recommended dry time is one day before sanding so we’ll let it set idle until Sunday.

For the record we used 3.5 quarts of System Three Yacht Primer on this part of the paint process. We could have used about half if leaving the aft section unfinished.


Time this segment:
Prepping, cleaning the inner hull for primer 2 hours
Three coats of primer 3 hours
Total this segment 5 hours
Total Project: 125 hours

Monday, July 13, 2009

Promised photo...


This is the first coat of primer. I was a little disappointed with the coverage but it is what it is. I will need another quart to get the recommended 3-4 mils dry film thickness. Not having a local supplier of this material will delay (again) getting the paint on but only by a day or two.

Sunday, July 12, 2009

I know, I know. I never write anymore

I know some of you have been wondering why there has been no activity on my blogs as of late. Well the old depression over our finances reared its ugly head again and threw the whole project into reduced production status. I finely kicked myself in the seat and said enough and fired the project back up into full swing. Two weeks of that time were spent on epoxy curing so in all we lost from about May 22nd to July 8th or 6 ½ weeks. Lets subtract the long 4th of July weekend since we were away for the holiday and to make me feel better. That brings us to right At 6 weeks lost to the monster.

Once back at it the first order of business was to go over the whole interior once again quickly with the sandpaper. I found several places that could have been filled and sanded one more time but the painting inside is more of an exercise than an attempt at perfection. I want to know how the System Three products go on and “learn” in an area far less scrutinized than the outer hull and decks will be. The interior of this boat will be used for storage of sails and little else.

Next getting the shop ready for applying the primer and paint. Everything takes longer than you want it to. I finished cleaning the shop or so I thought last night. This morning there was a fine layer of dust settled on all the horizontal surfaces, tables, shelves etc. This is not the first time I have cleaned it for paint duty, but it’s been a while so I wanted it as clean as I could expect or as I put it to myself “ a little cleaner than the last time I painted in here”. One benefit of the unplanned delay will be the possibility of completing the hull and deck sanding and fairing outside, eliminating the need to clean the shop to the extent it was this go round.

Today after dusting everything in the shop one last time and a quick vacuum of the boat I wiped all the surfaces to be painted with a 50-50 alcohol/water solution. After 3 rounds it looks good to me. I plan to begin applying the primer early tomorrow while the shop is still cool enough to keep from running any fans or even the dust filter.

We will be using the System Three Silvertip Yacht Primer, a waterborne, two-part marine epoxy primer. Two coats are the minimum recommended, three suggested if significant sanding is planed. We’ll see what two looks like and then make that call. This product dries by evaporation and multi coats are possible in a day. A full days cure is necessary before top coating.

Well that brings us all up to date. Keep an eye out for pictures to be posted late tomorrow.

PS: I need to tell you about the little 12’ sailboat we picked up for a hundred bucks some time. Perhaps later next week I’ll sit down and tell that story. Oh and then there’s the 10K rigging bid to address.

I’m not adding any time to the project here because it was negligible. Cleaning the hull took about 2 hours.

Wednesday, May 27, 2009

Rest in Peace
Phil Bolger
1927-2009


I was never a student to Phil’s designs but always respected his education, writings and spirit.

Gloucester Times: Boat creator 'leaves on own terms'